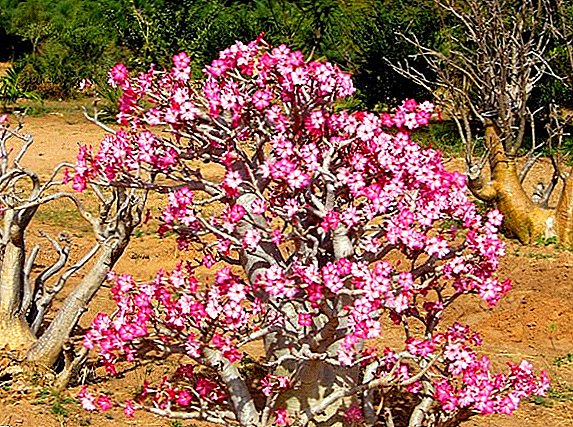
 Adenium is an exotic houseplant. He is part of the family kutrovye, and you can meet him in Africa, Kenya and the Arabian Peninsula. You can meet him in megalopolises only in flower shops. The plant can be recognized by the strong-branched stem.
He also has lanceolate leaves with pointed edges. His flowers are scarlet and terry, and the mouth is white.
In this article we will tell you how to grow adenium from seeds at home.
Important! Adenium is a poisonous plant, so it should be kept away from children and not put in children's rooms, and after contact with it, wash hands and tools that worked with this plant thoroughly.
Soil for sowing adenium seeds
 The optimal soil mixture for planting adenium seeds should be nutritious and loose. Acidity of the soil can be neutral or slightly acidic.
You can also add a little crushed charcoal, but before that it is better to sterilize it. Any fungicide is suitable for this.
The ground for adenium should include coconut fiber (50%), deciduous-humus soil (25%), expanded clay up to 3 mm (20%) and perlite (5-10%). If you cannot find coconut fiber in the gardener's shop, you can buy a pack of soil for succulents instead. The shredded polystyrene foam crumb or a broken brick enters it.
Did you know? The name "adenium" in many languages has the translation "desert rose".
Capacity Requirements
For sowing seeds, the optimal container should be low and wide, but most importantly, it should have good drainage holes at the bottom.
Cassettes for seedlings are also suitable, especially if you are going to plant several varieties. With proper earthen mix and adequate watering, clay or plastic pots will be suitable for planting adenium seedlings.
When the plant grows up, it is better to plant it in wide, but not deep containers, and deep pots will be suitable for young adeniums. 
Did you know? In nature, adenium can be found in Saudi Arabia, Yemen, Oman, in the countries of the African continent.
How to prepare the seeds before planting
Before planting adenium seeds in a pot, they need to be prepared. This procedure is not mandatory, but we recommend it all the same.
To begin with, seeds should be soaked in warm water and should remain so for the entire time of soaking. You can also add growth stimulants or a solution of any fungicide to the water. We recommend using "Fitosporin" or pink solution of potassium permanganate. As a growth promoter, Epin and Energin are most often used.
Sowing Adenium Seeds
At the bottom of the pre-purchased pot you need to lay out the drainage, which can be any: expanded clay, brick chips, pieces of charcoal. Cover half of the planting mixture and lay out the seeds on top flat. After that you should pour another earthen mixture into 1 cm. The earth should be compacted.
 Planting container to cover the top. For this fit the cut off top of a plastic bottle. You can use a plastic bag that closes on top. If you do not have enough substrate, and you do not completely cover the pot, you can cover the pot with cling film.
Before you cover the pot on top, moisten the mixture with a spray bottle. You can also water the pot with a teaspoon or pour some water into the pan.
After you have covered the pot with a lid or a wrap, mark the varieties by dividing the containers with partitions.
Conditions for germinating seeds
After sowing you need to put the pots in a warm place. A central heating battery or towel dryer in the bathroom will do. It is necessary to air such a greenhouse for 30 minutes in the morning and in the evening. Germinate seeds at a temperature not lower than 25 °. Lighting should be bright.
If done correctly, the first shoots can be seen on the third day. The average period of germination - 2 weeks. Do not worry if during this time the seedlings do not germinate, you can wait up to a month.
 A month later, when the seeds germinate, the film or cover can be removed. After the first shoots appear in all pots, they can be rearranged to a bright place, but at the same time keep heated. For the first 10 days it will be optimal to put them under the window on the same towel dryer.
Care of Adenium seedlings
Caring for adenium seedlings is not difficult. The main thing - to maintain proper lighting, as the plant is very fond of light. It is better to put pots with adenium on the south window, but the direct sun should not fall on the plant for more than five hours a day.
After winter, try to shade the plant a little, as burns from direct sunlight can appear on the trunk. In summer, the temperature for adenium should be no more than 30 ° C. Also, it sometimes needs to be put out into the street, under an awning, to protect it from rain.
Like all plants, there must be a period of rest for adenium. This happens during lowering the temperature and lighting. In winter, the temperature should not be below 10 ° C, and even better to stick to temperatures up to 15 ° C.
Important! Avoid overcooling the roots, it can lead to the death of the plant.
 In the summer, there should be regular watering after the soil is completely dry. In winter, it is better to water adenium a little and infrequently. It is better to do this after drying the soil. If you have chosen for adenium a place with a temperature below 15 ° C, then it is better to water the plant rarely or completely stop watering.
In early spring, it is better to water the plant 2-3 weeks after the appearance of buds.
Since adenium seedlings will actively develop, you need to carefully spray the plant with a small spray. After the beginning of flowering, you need to spray the plant gently so that water does not fall on the flowers.
Many novice gardeners are interested in what to feed adenium and whether it should be done at all. Our answer is worth it. For home plants use fertilizers for indoor plants. It is necessary to feed the plant in spring, summer and early autumn, but not more than once a month.
The concentration of the fertilizer solution should be up to 2%.
Pickling seedlings
After the small adeniums grow up, you will need to pick them up. Transplantation of young copies of adenium occurs every year in spring. Capacity for them should be light. This protects the plant from excessive heat.
There are several reasons due to which adenium has to be transplanted.
 For young plants, the first reason for transplanting is the cramped pot. It is better to be patient and several pots of different widths, since if you take the pot wider than necessary, the plant will grow slowly and its roots may begin to rot.
Seedlings are transplanted every 3 months during the growth period.
Adenium should also be transplanted for root diseases. Hypothermia and waterlogging causes such diseases.
If you notice that your plant grows slowly and dries out, it is better to dig it up, cut off the damaged areas and cover it with a fungicide. After it dries, it needs to be transplanted into a new earthen mixture.
Inappropriate soil mix may be a problem. This can happen only if you bought already planted adenium. It is better to transplant the plant immediately after purchase, until the mixture showed its harmful qualities.
Before landing, we recommend the following procedures:
- A few days before transplanting the plant needs to be watered and when the earth dries out, it can be transplanted.
- If you accidentally damaged the roots of adenium, then wounds should be powdered with colloidal sulfur or charcoal crushed to powder.
- When transplanting, we recommend not to touch the earthen clod, as this may damage the roots of the plant, but if you transplant young seedlings, then you need to save the plants from heavy coma.
- The problem with watering adenium after transplantation is often found in beginners. It is important to remember that a young plant is best watered 3-4 days after transplantation. Seedlings - for 2-3 days.
- After transplanting the plant is not necessary to spray.
- The soil mixture for adenium should be loose, so we recommend taking leafy, soddy soil, coarse sand and some charcoal.
- At the bottom of the pot should be good drainage.

Since young adeniums can often be subjected to any diseases and pests that are most often found in the soil, it is necessary to sterilize the soil. It is very easy to do this with the help of a microwave, heating in an oven, over steam, in a saucepan, by freezing or by chemical preparations.
We will tell you about all methods of sterilization.
- Microwave. The substrate is poured into glassware, the bottom of which is filled with a small amount of water, and processed in the microwave for 15 minutes at medium power. Cover the glassware with a lid. Putting the factory package with the mixture in the microwave is not recommended.
- Oven. A slightly wet substrate should be laid out on a baking sheet, covered with foil and placed in an oven for 1.5 hours at a temperature of 150 ° C.
- Above the steam. For this we need a colander or an iron sieve. Cloth creeps to the bottom so that the earth does not wake up through holes. The substrate is poured from above and heated over the steam for an hour. The main thing, do not forget to add water to the pan as it evaporates.
- In the pan. Land should be poured into a saucepan with a small amount of water. Then you need to put the container on the gas stove. After the lid begins to "rise", you need to turn down the gas and steam the substrate for another 30 minutes. The lid must not be removed until the pan is completely cooled.
- Chemicals. Most often fungicides "Maxim" and "Fitosporin" are used, as well as the insecticide "Intavir". This procedure is repeated in a week.
- Freezing In this way, everything is very simple. The substrate should be left on the balcony for the winter or the freezer should be used, but since the frost does not affect all parasites, it is necessary to treat the soil with chemical preparations.

Did you know? Such names for adenium are known - the desert rose, the star of Sabinia, the Impala lily.
Further care
After a transplant, caring for adenium at home is not as difficult as it seems.
Let's start with trimming. Carry out this procedure in the spring, when the growing season begins in adenium. This procedure is not necessary, but if you have a desire to form a tree or a bush from it, then it is even necessary.
If you want to form a tree, then you need to cut the side branches of adenium no more than one-third. When forming a bush you need to cut even lower. This applies to every branch of adenium. 
You also need to mention about what you need to feed adenium. The plant is very positive fertilizer. You can make slowly soluble fertilizers or regularly feed it with a solution of organo-mineral fertilizers.
Top dressing is made during flowering and growing season, about 1-2 times a month.
It is important to mention that phosphorus-potassium fertilizers have a positive effect on flowering and strengthen the plant.
Many florists feed the plant 3 times a month with complex fertilizers for streps and violets, and during flowering adeniums will suit fertilizers for cacti and succulents.
Did you know? Adenium grows slowly, so it can be used in compositions of succulents and cacti.
As you can see, adenium is very simple to grow, and sowing its seeds does not take much time and labor.


