The furnace is a device for the heat treatment of raw materials or space heating. It is used on industrial and domestic scales, runs on liquid, solid fuels, gases or electricity. There are different types of domestic stoves, which were formed under the influence of the needs of different nations. Among the large number of different furnaces there are 3 of the most popular types. This is a Russian stove, a Franklin stove and a Dutch stove. This article will look at the Dutch oven, also known as Dutch, Galanka or Gulanka: the features of its design, the principle of operation and the basics of building this furnace with your own hands.
The origin of the name of the furnace
For the first time this type of masonry appeared at the beginning of the 18th century in Holland. It was the country of origin that gave this furnace its name. The lack of space in residential premises and the need to heat them in cold, wet weather led to the fact that the stoves began to be installed vertically and the length of the smoke attenuation was increased.
A large area of smoke attenuation ensured rapid heating of the air, and the unique design of the chimney that arose later allowed the smoke to be removed from several fireboxes at once. Thus, the Dutch reduced the amount of tax paid on chimneys.
Important! There is no classic laying pattern for the box. You just need to adhere to the basic rules of masonry and use quality materials to get a durable and high-quality oven.
Types of Dutch ovens
These furnaces are divided into types depending on the size and principles of laying out. 
Did you know? The Dutch oven first appeared on the territory of Holland at the beginning of the 15th century and, with the advent of Columbus, began to spread rapidly across other countries, gaining worldwide recognition and the status of a national symbol in 3 centuries.
Small
Suitable for heating small rooms (maximum twenty square meters). Its length is half a meter. It is assembled from bricks, filled with clay mortar at the base. The required wall area is achieved by laying out a high chimney. 
Large
A large building the size of an average cabinet, suitable for rooms of 60-70 square meters. Only professionals can make such galanka. It is very important to adhere to the layout, otherwise the structure will be fragile and can crumble.
Kolpakova
Stops furnace gases under the hood before they exit through the chimney. This increases the productivity of the structure. If the masonry is not properly assembled, the risk of room smoke will increase.
Round
It is considered the most budget option. German type of galanka. This construction is laid out in a quarter of a brick and at the same time serves up to 10 chimneys. Differs in intensive accumulation of soot, therefore very fire-hazardous. This type needs regular cleaning. 
We advise you to read about how to make a summer shower for the dacha with your own hands, a wooden barrel, a sofa of pallets, a stepladder, a snow shovel and a trellis for the grapes.
Groom Grzhimailo
It has a metal casing inside which bricks are laid out in rows. Requires regular cleaning, as it has a cap. Intensively gives off heat in the upper part, mainly installed in the center of the room. Be sure to have a foundation. 
Galanka with a stove
Gives dispersed heat to the stove due to fuel smoldering. Suitable for heating food and slow cooking. It has the same length as a small laying, 80 centimeters wide. 
The principle of operation and the device furnace
Galanca differs from the classic furnaces with elongated smoke and chimney. In bell-type furnaces, smoke circulation is practically absent, giving way to a spacious cap with a view. The combustion chamber and the grate are preserved, the size of the firebox is reduced compared to classic fireplaces, but it is worth opening the doors - and the stove turns into a fireplace.
We recommend reading about how to put the socket and the switch, how to remove the paint from the walls, whitewash from the ceiling, how to glue the wallpaper, how to whiten the ceiling, how to make a plasterboard partition with a doorway, and also how to sheathe the walls with plasterboard.When fuel is ignited in the firebox, cold air drawn from the street begins to warm up in smoke turns or a cap. The internal walls of the furnace heat up, the air in the room warms up. Due to the good draft of cold air outside, warm air is not consumed to ignite the fuel. The larger the firebox and the longer the smoke, the more heat the construction gives.
Important! Before you first melt a new head, it must be given up to 30 days for shrinkage and complete drying. Raw materials can become cracked when suddenly heated and cause structural failure.
 The principle of operation of the furnace
Advantages and disadvantages of the Dutch oven
Due to the long history of modifications, this furnace has very few negative features.
Benefits
The furnace has the following positive qualities:
- The design is insensitive to ordering. If you avoid blunders, it will serve well, even if it is composed by a self-taught master.
- From the furnace it is easily transformed into a stove, and the productivity at the same time remains quite high.
- Does not require a lot of space. The minimum dimensions are 50x50 cm.
- The laying takes 3 times less material than a Russian stove with the same heating properties.
- Smoke turns easily extend on 5 and more meters, at the same time keeping heating properties to the top floor.
- Refractory material is needed only for the firebox. The remaining area of the galanka can even be made of hollow bricks.
- Smoke turns are heated quickly, and cool for a long time. The need for frequent ducts disappears.

disadvantages
There are disadvantages of this design:
- Efficiency barely falls to 45%. In this regard, it does not compare with the Russian stove.
- With a randomly open view, it quickly loses all the accumulated heat and is filled with outside air.
- Sensitive to fuel. Requires high-quality materials, otherwise it does not have time to warm up. The optimal mode of operation - a long smoldering.
Did you know? Since Holland gained its independence at the beginning of the 16th century, local authorities began to levy a tax on the number of chimneys to each individual farm. The enterprising Dutchmen didn’t lose their head and began to adapt the construction of the chimney to the 3, 4 and even 12 chimneys. No other stove can simultaneously remove such a quantity of smoke without smoke from residential premises.
Dutch oven do it yourself
Due to the simple construction and rather high productivity, the head has gained great popularity among beginning stove-makers and self-taught masters.
Video: Dutch oven
It will be useful for you to read about how to properly glue the baseboard, how to put a plastic window sill yourself, how to install blinds on windows and a shower cabin in an apartment, how to lay tiles on the floor and on the bathroom wall, how to install a sink in a tabletop, how to do it yourself wooden floor is warm, how to lay a warm floor under the laminate, linoleum and tile.
Construction features
The furnace has the following special features:
- a thin body in one or half bricks ensures fast and uniform heating;
- no grate for the grate (in the classic version). Thanks to this feature, the stove with the doors open turns into a fireplace;
- no camera for ash. Fuel is used in quality, burns out slowly, so there is almost no ash;
- the firebox should be made of refractory bricks using clay mortar;
- the presence of elongated channels for smoke. Air circulates through them. It heats up in the firebox, rises up, heats the walls, descends down the adjacent channel back into the firebox, heats up again and then escapes through the chimney;

Important! Thermal insulation, laid between the foundation of the head and directly laying, increases the efficiency of the furnace due to the fact that the heat from the furnace does not go into the foundation.
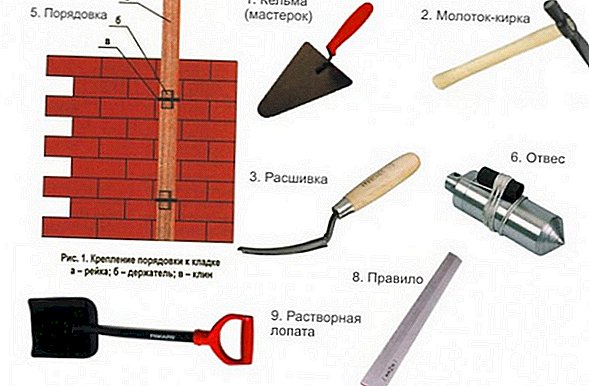
Tool kit and materials
To collect quality Dutch, you need the following.
Instruments:
- Master OK;
- knife;
- hammer (pickaxe);
- jointing;
- roulette;
- plumb lines;
- levels;
- capacity for solution;
- scapula;
- mixer;
- Bulgarian for bricks;
- Order (wooden lath with elevations of rows of bricks).
Materials:
- fireproof and corpulent (better ceramic) bricks;
- mix for clay solution;
- furnace doors, latches, grate;
- steel wire (3 meters);
- asbestos cord;
- ruberoid;
- metal fittings;
- wooden formwork.
Foundation creation
The foundation of the cylinder is poured separately from the basement of the house so that during shrinkage the masonry does not start to move. The size of the foundation should be 20 centimeters larger than the base of the furnace.
Base
It is laid taking into account the depth of winter freezing of the soil in each specific region. Typically, this depth is 0.8-1 m. The soil should be dense. If there is ground water nearby, the furnace will not stand for long. The first layer is sand (15 cm).  The second is broken brick and large stone chips (20 cm). The next layer is crushed stone (10 cm). The last layer is concrete (7 cm). After partial solidification, the reinforcement is laid (not thinner than 5 mm) and another 8 cm of concrete is poured.
Waterproofing
Only synthetic materials are suitable for this purpose. Usually it is roofing sheets or thick sheets of ruberoid. Insulation fits into 2 layers.
Preparation for the start of construction
Lay a few sheets of basalt cardboard between the first row of the laying and the sheets of roofing material. This material is an excellent heat insulator, it will increase the efficiency of the furnace. To make sure that the masonry is correct and stable, lay out a few rows of bricks, not holding them together with mortar. If you see that the masonry lies flat, disassemble the finished rows and fold them again with the solution.
Important! If you are laying bricks out of bricks that have already been in use, ensure their integrity and carefully remove any residual mortar before using it again.
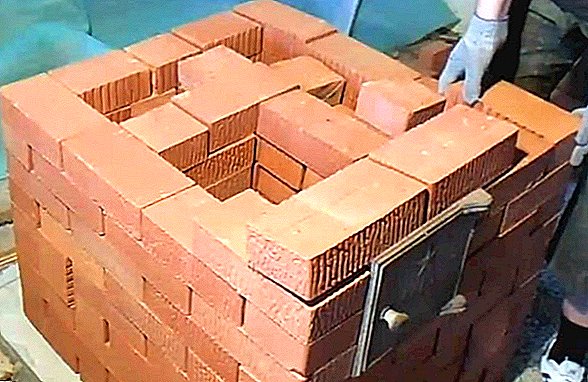
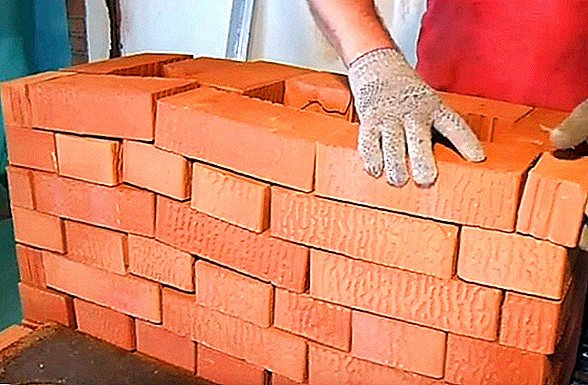
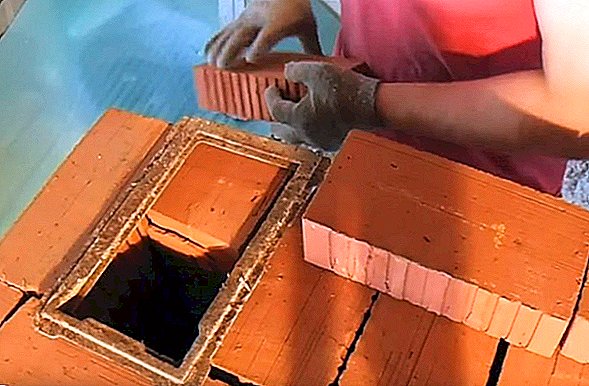
Oven building
To make the construction of the highest quality and durable should follow the technology of construction:
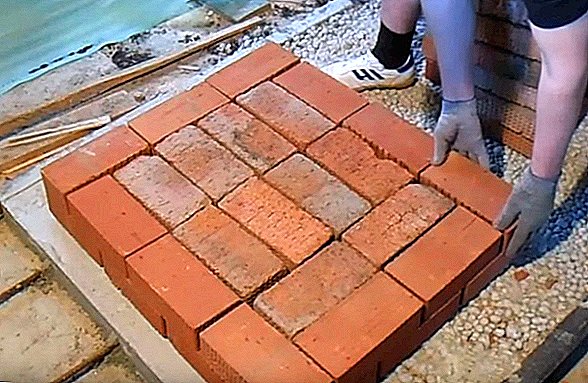
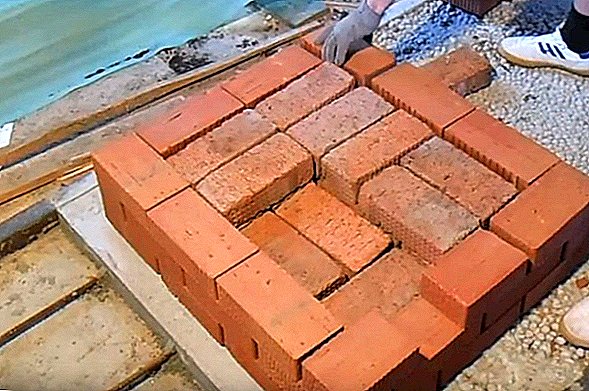
- Fold the first row of bricks into a square with a side of 3.5 bricks.
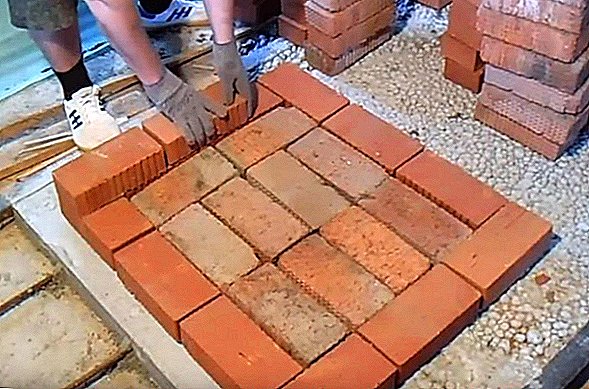
- Lay the foundation in smaller squares with a side of 2.5 and 1.5 bricks. In the center lay half.
- In the second row, fold the three sides of a size of 3.5 bricks.
- Add a third row, identical to the second, and install a clean door measuring 13x13 cm. Add a blower door measuring 13x26 cm.
Did you know? The Dutch woman can work effectively only on very high-quality fuel. The fuel that burns quickly this furnace can not heat. For the Dutch, expensive fuel has never been a problem, since the Netherlands for centuries engaged in maritime trade, catching expensive fish from its shores and raising valuable livestock. Since the XVI century, these people began to receive additional income from piracy, and even the sailors did not shun robbing of passing private and merchant ships.
- In the fourth row, halve the length of the ash chamber with an additional brick in order to put a grate grid of 25x18 cm and with a second additional brick, overlap the base of the small bell.
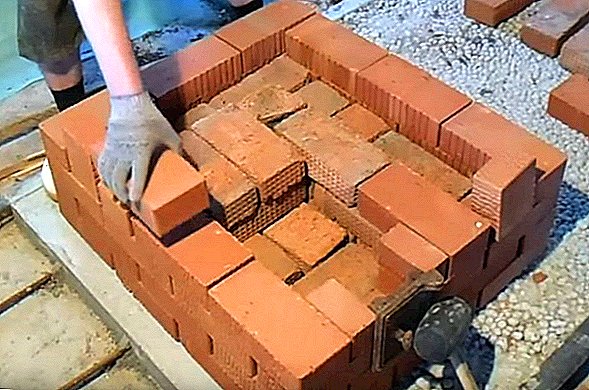
- Make the fifth row with a solid contour and free space for the firebox.
- Lay out the sixth, seventh and eighth levels identically to the fifth, leaving a space of one brick in size for a furnace door measuring 21x25 cm. Install the door in an aluminum box.
- Lay out the ninth level in the same way as the eighth level, leaving a burnout of 2 cm in size between the two innermost bricks.
Did you know? Due to its efficiency and the need for the Dutch to save every piece of land in the golanka, starting from the end of the 15th century, it is equipped with extended smoke circulation. They can be half the height of the floor, and can stretch to 4-5 floors, heating the upper floors as effectively as the lower.
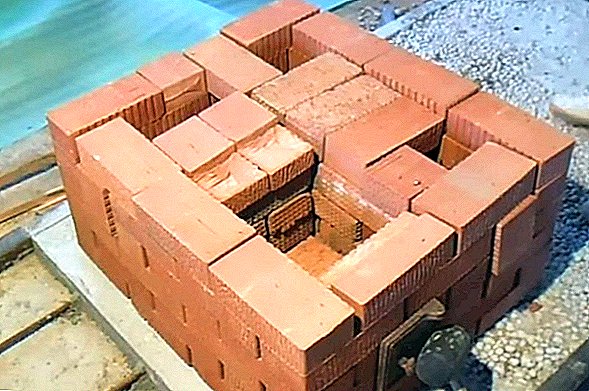
- The tenth row fold in a similar way, leaving a burnout gap.
- In the eleventh row lay the burnout completely.
- Repeat in the same way the twelfth row.
- In the thirteenth row, install a cast-iron stove with a size of 71x41 cm. Note that this stove warms up predominantly in the center, therefore it is only suitable for warming up with a slow decay to a temperature not higher than 300 degrees. The remaining space of 1.5 to 3.5 bricks will be the basis of the heating flap. Lay it with bricks.
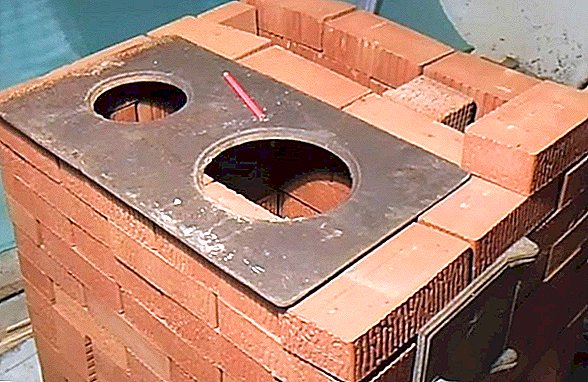
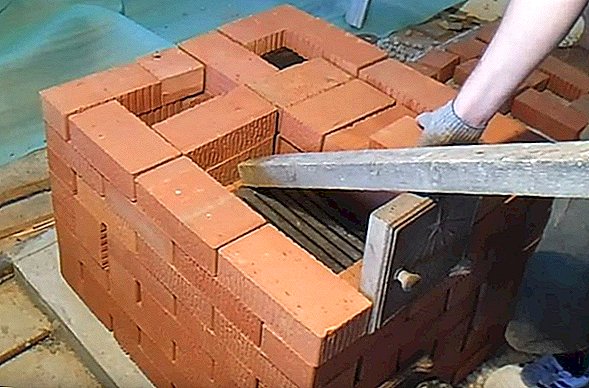
- Fourteenth row collect in the same way as the thirteenth. Installation is complete.
- Proceed to the lining of the firebox. Remove the cast-iron plate and clean the walls of the solution.
- Assemble the first row of the firebox from refractory bricks with undercuts to install the grate grate 25x18 cm.

- Make sure that the gaps between the firebox and the outer contour are at least six millimeters, and that the solution does not get into them when they are laid. Put the grate in the undercuts of the grate size 15x4x23 cm
- Install the first row of lining of the undercoat of two longitudinal thirds and 1/6 of the refractory brick.
- Lay out the second row of lining, align it with the level of the firebox.
- Lay out the third row of lining as follows. Install bricks on a small longitudinal edge. If you followed the instructions exactly, the top row of the lining will be in line with the top opening of the furnace door.
- The fourth row of lining will block the opening above the door. In the top row of bricks, be sure to leave a burnout slot measuring 2x1.25 cm.
- The fifth level of the lining should block burnout.
- The sixth row of lining is laid out in a solid outline. The upper level of the lining will protrude above the level of the outer contour. Such a brick should be cut to one level with an external contour.
- Install a cast iron plate.
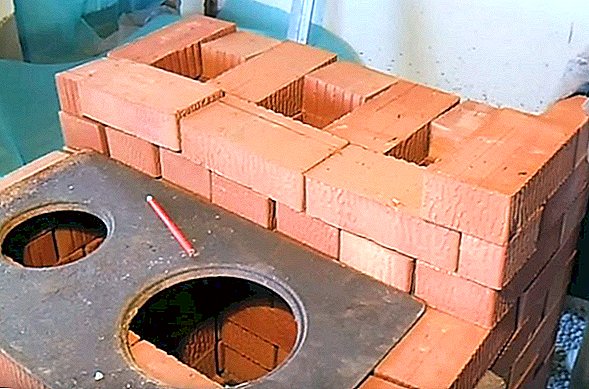
- Continue to build the shield. Collect the fifteenth and sixteenth rows in the same way as the thirteenth and fourteenth. Extension of rows will help to increase the heat capacity of the furnace (not more than twenty rows per cap).
- The seventeenth row will be the overlap above the cap. To assemble the ceiling, lay the outer contour bricks with undercuts. Leave a hole for the lift channel.
- Clear the bricks from the mortar and close the cap.
- Lay out the eighteenth row. In the end wall, leave space for a clean door measuring 13x13 cm. Similarly, collect the nineteenth row.

- At the twentieth level, overlap the upper door opening with a brick and make a cross cut for the lifting channel. Lay out the twenty-first and twenty-second levels in the same way.
- The twenty-third row will overlap the top cap. The outer contour of the fold of bricks with undercuts.
- Shut off the top cap, leaving the lift channel free to move.
- Place a 13x13 cm valve over the lifting flue.
- Lay out another twenty-fourth row of bricks with a cut in the shape of a semicircle for easy access to the valve.
- Lay out the next two rows in the same way. Cutouts are not required.


You will probably be interested to read about how to build a pool, bath, toilet, BBQ, cellar and porch and formwork for the foundation of the fence with your own hands.
Chimney masonry
Brick chimney serves better and longer than its metal counterparts. For this furnace is suitable tube called chetverik. This design, the length of the face of which is 1.5 bricks. If your room is single-storeyed, and you immediately bring the chimney out, the construction will be simple in the shape of an elongated parallelepiped.
If your chimney passes through the interfloor overlap, you will need to display fuzz. Earthing is an extension of the chimney in the ceiling, made for greater fire safety. Due to the fluffing, hot gases will not heat flammable ceiling materials. 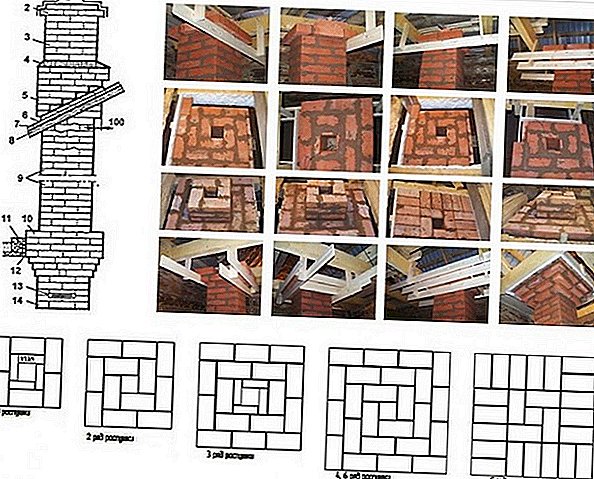 Chimney layout and order Chimney masonry technology:
- Spread chimney out of standard ceramic or simple solid bricks. Rows collect identical to the twenty-sixth kiln, until you reach a distance of three bricks to the interfloor overlap (19.5 cm).
- Prepare a hole in the ceiling size 60x60 cm
- Pull back from the section of the pipe 3 cm and collect the first row of the fuzz. It will be a square with the same sides of brick, laid out longitudinally, quarter brick and one transverse brick.
- The second row collect from eight longitudinal three-quarter on the horizontal sides and two transverse three-quarter on vertical, receding 3 cm from the previous section.
- For the third row, step back from the 3 cm section of the pipe and assemble it in the form of a square with identical sides of brick laid out longitudinally, three-quarter brick and one transverse brick.
- Lay the fourth level in the same way as the twenty-six kiln, then make the outer contour with horizontal sides of three-quarter, quarter, whole transverse brick, three-quarter and quarter. The vertical sides will consist of a three-quarter, longitudinal brick and another three-quarter.
- Level five collect twelve bricks. Вертикальные стороны сложите из пяти поперечных кирпичей, оставшееся место на горизонтальных сторонах заложите двумя продольными кирпичами.
- Шестой уровень соберите аналогично второму.
- You can continue further laying according to the twenty-sixth furnace row to the output to the roof. Complete the chimney with a stainless steel umbrella. The umbrella will protect your stove against ingress of foreign objects, precipitation and reverse thrust in case of changes in air flow. Leave the finished stove and chimney dry for two to three weeks. Start the kindling step by step so that the material heats up smoothly and does not crack.
Important! It is only necessary to coat the stove after preheating to twenty-five or thirty degrees. Tile, laid on a cold oven, will begin to expand in the process of kindling and showered from the walls.
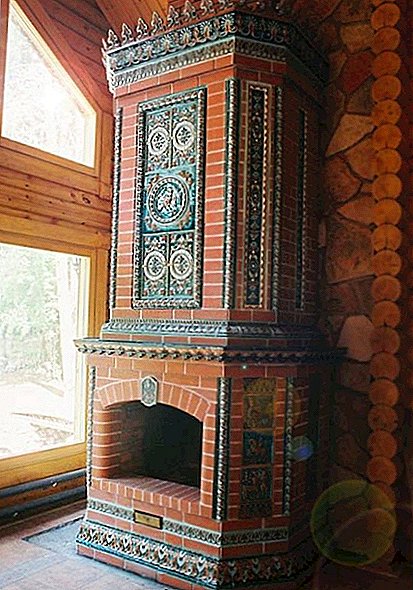
The end of the building and the lining of the furnace
Cladding is the application of decorative tiles to the shield and the furnace section of the furnace to improve the appearance of the structure. Begin facing no earlier than a month after continuous use of the furnace, so that the bricks and mortar shrink and do not affect the quality of the facing.
To calculate the right amount of materials, measure the total area of the furnace. From it you will need to subtract 2-5 mm for each intersect gap. The interstitial gap is the distance between the tiles from which the mortar begins to dry. Also add to the amount of material received 10% of the safety stock for chipped, scrap and trimming.
The most popular method of lining is offset seams. With this method, the vertical seams of tiles on different horizontal rows do not coincide by 3-5 cm. This allows you to hide the imperfections of the lining. Only heat-resistant tiles are suitable for cladding, so do not save on material.
Video: tile facing Majolica, clinker, porcelain stoneware and terracotta serve these goals best of all. The finer the tile, the stronger it will stay on the surface of the furnace. Pick up 2 types of tiles (small and large) and lay out 3-4 bottom rows with large tiles so that the small pattern does not begin to move after laying.
In addition to the tile, you will need crosses to align the joints, tile cutter, trowel, heat-resistant grout, rubber hammer, primer, glue, mounting grid and plumb. The optimal solution is clay, the same used for stove installation. You can buy ready-made adhesive mastic, but its quality will depend on the cost.
Did you know? In the Slavic countries, golanki appeared thanks to Peter I. He brought from the Netherlands not only knowledge of the ship's business, but also the principle of laying amazingly economical stoves. In order to quickly introduce the bottle into the everyday life of the people, the king issued a decree according to which it was forbidden to lay out stoves without chimneys in order to avoid fires.
Before starting the lining, clean the surface of the furnace from the remaining solution. Fix the mounting grid to the furnace surface with self-tapping screws, level the surface with plaster. Prime the walls with a heat-resistant primer and apply an approximate marking of rows, focusing on the plumb line. Prepare the mortar 10 minutes before the lining starts so that it does not start to harden in the process.  Warm the bottle slightly to 25-30 degrees and start facing from the bottom corner, leaving a gap of 0.5-1 cm between the floor and the first row. Apply glue mass with a thickness of 5-7 mm on the tile with a spatula and install it into place, hitting the tile with a rubber hammer if necessary.
Align the seams between the tiles with a cross. After drying, they will need to be filled with grout. For one approach, collect 3-4 rows, and then take a break for 4 hours to allow the glue to dry. If the breaks are not done, the lining will begin to crawl under its own weight.
After finishing the lining and complete drying, begin to form trowels. Apply the grout with a spatula, and then give them a concave shape with improvised means. A toothbrush handle, a smooth ballpoint pen body, a thin rubber tube will do.
The grout dries in 2-3 hours. After this time, you can begin cleaning the tiles from the grout residues. The grout can be easily removed with a cloth moistened with soapy water or a special solvent. After finishing works, you need to wait 3-4 weeks and only then put the furnace into operation.
Video: tile facing
Important! The use of cement mortar for fastening bricks is prohibited. It does not belong to the refractory, so during the operation it will crack dry and open the seams between the bricks.
Dutch ovens appeared more than 4 centuries ago, and during this time their design has undergone many changes. They are used for heating private houses and cooking. The device of this furnace is simple, with due diligence, even a novice can cope with the laying of the head.
It will fit into any interior. Golanka is an economical way of heating, since it best of all warms up the room in the slow smoldering mode. After a full cycle of assembly, drying and cladding, it becomes an important and necessary element of the interior and a source of pride of the owner.